CPL / ME : Practical test guide FAA
This manual is a compilation of flight training maneuvers and procedures for the Beechcraft BE--76 Duchess. This manual provides standardized procedures for completing each VFR and IFR maneuver required by the FAA’s Practical Test Standards for the Private Pilot Practical Test.
This manual does not take the place of current FAA publications. References to those publications should be used in order to enhance the students understanding of each maneuver.
It is important to keep in mind that this manual provides only a standardized guide to performing each maneuver, and that actual pitch or power settings may vary. All VFR maneuvers should be completed with references to pitch attitude made using the horizon. All IFR maneuvers should be completed with references to pitch attitude made using the attitude indicator.
The student should be aware that small adjustments to pitch and power should be made in flight in order to successfully complete each maneuver.
It is the instructor’s responsibility to teach each maneuver based upon this guide and to ensure the student fully understands and can perform each maneuver required.
This manual should serve only as a guide to completing the required maneuvers and should not be used in place of competent instruction or thorough and complete study of FAA publications. Students should use this manual in combination with the Airplane Flying Handbook, the Instrument Flying Handbook, the Pilot’s Handbook of Aeronautical Knowledge, the FAA Practical Test Standards, and any other relevant FAA documents.
These are the normal procedural steps to be followed when conducting training in the BE--76 under Visual Flight Rules and Instrument Flight Rules. All maneuvers will require the pre--maneuver checklist to be completed prior to commencing each maneuver.
MINIMUM ALTITUDES
Simulated engine failures will be practiced on dual flights only. Simulated failures shall only be conducted at a minimum altitude of 4500 feet AGL.
CLEARING TURNS
A minimum of two clearing turns are required before each maneuver to ensure there is no traffic in the area. Clearing turns should be done at a bank angle of 30° with each turn being at least 90°. There must be a break between each turn (one 180° turn does not substitute for two individual 90° turns). Emphasis should be placed on keeping the aircraft in a limited geographic area to complete the maneuver.
POSITIVE EXCHANGE OF FLIGHT CONTROLS
During flight training, there must always be a clear understanding between student and flight instructors of who has control of the aircraft. A positive three--step process in the exchange of flight controls will be conducted.
When the instructor wishes the student to take control of the aircraft, he or she will say, “You have the flight controls.” The student will acknowledge by saying, “I have the flight controls.” The flight instructor again says, “You have the flight controls.” When control is returned to the instructor, follow the same procedure. A visual check by both student and instructor to verify the exchange is also recommended.
To ensure a positive flight training experience, briefings should be used for certain phases of flight so that all parties involved understand important characteristics of the flight.
PASSENGER BRIEFINGS
During the “Before Start” checklist, each aircraft occupant should be thoroughly briefed on:
- Seatbelt operation.
- Fire Extinguisher location and use
- Emergency Exits
- No smoking.
- Engine Fire during start TAKEOFF BRIEFINGS During the “Before Takeoff” checklist, the pilot should give a takeoff briefing that includes:
- Who is taking off?
- Runway in use.
- Runway in length
- Applicable aircraft V--speeds.
- Takeoff distances.
- Emergency procedures during takeoff.
- Positive exchange of flight controls.
- ANY QUESTIONS?
APPROACH BRIEFINGS
When approaching an airport for landing under VFR, the pilot should give an approach briefing that includes:
- Active runway.
- Current ATIS/Weather
- Type of landing.
- Landing distance. For IFR flights, the pilot should use the approach plate as a guide to give the approach briefing proceeding from the header to the minimums section of the approach plate.
- Frequencies.
- Inbound final approach course.
- MDA or DA.
- Timing.
- Missed approach procedure.
An excessive drop in engine RPM during the magneto ground check is often due to a fouled spark plug. The following procedure should be used for clearing a fouled spark plug:
- Verify the engine oil temperature gauge is within the normal operating range or, “In the green arc”.
- Verify that the magnetos are set to both.
- Smoothly apply power to 2400 RPM.
- Lean the mixture until the first indication of an RPM drop or engine roughness.
- Maintain this mixture and RPM combination for 20--30 seconds.
- Move the mixture control to full rich while simultaneously reducing power to 2200 RPM. Perform the magneto check again and if within limits continue with the before takeoff checklist. If not, return to step #3 and repeat the spark plug clearing procedure.
- If after the second attempt the magneto drop is still out of limits, return to the ramp for maintenance and advise flight operations.
- Visually scan the areas left, right, above and below the airplane
- Gently lower the wing on the side of the first intended turn and visually scan the area previously blocked by the wing
- Perform two medium bank 90--degree turns in the same or opposite directions
- If any traffic that might be a factor is observed, the pilot flying should immediately announce it
- Rollout wings level and start the maneuver
- Turning maneuvers should be made in the direction of the last cleared area
- Perform “Cruise Checklist”
- Power setting…………………………………..….………………….20”MP/2300 RPM
- Fuel Selector valves…………………………………….………………………………….ON
- Carb Heat…………………………………….………………………..……….AS REQUIRED
- Mixtures..……………………………………………………….……………….…………. RICH
- BOOST pump…………………………………………………………….…………………….ON
- Autopilot………………………………………………………………………………………..OFF
- Landing Light…………………………………………….………………….………….……..ON
- Master……………………………………………………….……………………….………….ON
- Ignition on……………………………………………………………….…………….……BOTH
- Seat Belts……………………………………………………..…………….…………SECURED
- Position Report…………………………………………..………………………COMPLETE
- Clearing Turns……………………………………………………………..….….COMPLETE
- Selection of Emergency landing site………………………………..……..CHOSEN
Taxiing is the controlled movement of the airplane under its own power while on the ground. Since an airplane is moved under its power between the parking area and the runway, the pilot must thoroughly understand and be proficient in taxi procedures.
- A taxi clearance must be obtained from ground control prior to moving an aircraft onto the airport movement area when an air traffic control tower is in operation.
- At an airport without a control tower or when the tower is closed, the pilot should announce his or her intentions to taxi on the appropriate frequency.
- When first beginning to taxi, the brakes should be tested for operation as soon as the airplane is put in motion. If braking action is unsatisfactory, the engine should be shut down immediately.
- Steering the airplane is accomplished with rudder pedals and minimal usage of brakes. Turns should be made at a slow, safe speed.
- The taxi speed should be slow enough so that when the throttle is closed the airplane can be stopped promptly.
- When yellow taxiway centerline stripes are provided, the airplane’s nose wheel should remain on the line unless necessary to clear other airplanes or obstructions.
- In no--wind, the ailerons and elevator controls should be held in a neutral condition.
- In windy conditions; • Headwind: Deflect ailerons into the wind, neutral elevator. • Tailwind: Deflect ailerons away from the wind, elevator full forward.
- While taxiing, clear all taxiway and runway intersections visually and verbally, i.e.” Clear left, clear center, clear right.” Also, when taxiing onto an active runway clear the final approach paths in both directions.
- Although ATC issues a taxi clearance, it is the pilot’s responsibility to avoid collision with other aircraft, vehicles, and objects on the ground.
Entry
- Enter at 45° to the downwind at a point abeam of midpoint of the runway in use unless directed otherwise by Air Traffic Control.
Downwind Leg - Maintain ground track parallel to and approximately ½ mile out from landing runway.
- Maintain traffic pattern altitude ± 100 feet.
- Commence “Before Landing Checklist” no later than abeam midpoint of runway when entering downwind leg from crosswind leg. Gear Down Midfield Downwind. 1st configuration check
- Abeam touchdown point, reduce power to approximately 12--15 Inches MP. Maintain attitude with pitch control. Verify speed is within the white arc, extend flaps 10o. Decelerate to 105 KIAS abeam of intended touchdown point.
- Turn base when intended touchdown point is approximately 45o behind wing.
Base Leg
- Maintain 95 KIAS during turn to base leg.
- Maintain ground track perpendicular to extended centerline of runway, downwind to base turn, flaps 20o, (2nd Notch). 2nd Gear configuration check
- Turn final with a maximum 20o angle of bank so as to roll out on extended centerline of runway at least ¼ mile from approach end of runway.
- PROPELLER levers FULL forward
Final Approach
- Maintain ground track over extended centerline of runway. (2) Extend flaps to 30o, unless winds preclude full flaps.
- Reduce airspeed to 85 KIAS or as necessary for the type of approach being used.
- Adjust pitch and power as necessary to maintain airspeed and descent angle. 3rd and final Configuration Check
- On short final, with landing assured, slow to 75 knots
- If at any time you do not have a stabilized approach, a Go Around should be initiated.
- Exit runway at next taxiway or as directed, if full stop, clear runway, stop airplane, complete “After Landing Checklist”, and contact ground.
Departure Leg
- Maintain ground track over centerline or extended centerline of runway.
- Climb at airspeed appropriate to type of takeoff until reaching traffic pattern altitude.
- If remaining in traffic pattern, turn crosswind at 300 feet below traffic pattern altitude and beyond departure end of runway. If departing traffic pattern, continue straight ahead or turn from the takeoff leg when within 300 feet of traffic pattern altitude.
Crosswind
- Maintain ground track perpendicular to extended centerline of runway.
- Climb at airspeed appropriate to type takeoff until reaching traffic pattern altitude.
- Complete “Normal Takeoff Checklist”.
- Flaps -- UP.
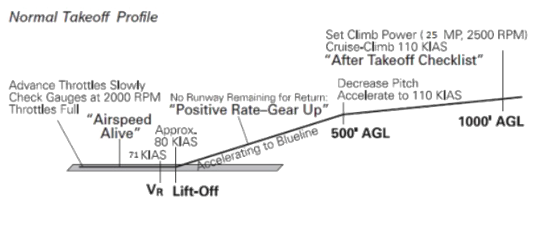
- Align airplane on runway centerline.
- Determine wind direction and speed, and hold aileron into wind.
- Advance throttle smoothly to maximum power.
- Maintain directional control on runway centerline using rudders.
- Adjust ailerons as necessary for existing wind conditions.
- Verbally verify “Airspeed alive and Engine Instruments are in the Green. “
- Lift nose wheel at 71 KIAS and accelerate to VY.
- Positive rate of climb and no more useful runway, GEAR UP
- Climb at VY with takeoff power until traffic pattern altitude or safe maneuvering altitude.
- Maintain ground track over extended runway centerline until a turn is required.
- Comply with Local Noise Abatement Procedures.
- At 500 feet AGL, complete “Climb Flow”. Complete Climb Checklist at or above 1000 AGL
- At 500 feet AGL, Set power to 25 in MP, Set Prop to 2500 RPM
- At 300ft below Traffic Pattern altitude, initiate a turnout to the desired direction.
- Complete “Takeoff Checklist” appropriate for aircraft.
- Position aircraft at beginning of runway aligned on centerline.
- Determine wind direction and speed; hold aileron into wind. 4. Apply brakes and smoothly advance throttle to maximum power. 5. Check engine instruments “Green” and release brakes.
- Verbally verify “Airspeed alive and Engine Instruments are in the green. “
- Maintain directional control on runway centerline.
- Adjust ailerons as necessary for existing wind conditions.
- Rotate at 71 KIAS and accelerate to VX.
- Climb at 80 KIAS until obstacle is cleared, or at least 50 feet above the surface, then accelerate to Vy.
- As soon as positive rate of climb is established, GEAR UP
- Maintain VY and takeoff power until traffic pattern altitude or safe maneuvering altitude.
- Maintain ground track over extended runway centerline until a turn is required.
- At 500ft AGL Complete “Climb Flow”. Complete Climb Checklist at or above 1000 AGL
- At 500 feet AGL, Set power to 25 in MP, Set Prop to 2500 RPM
- At 300ft below Traffic Pattern altitude, initiate a turnout to the desired direction
- Complete “Takeoff Checklist” appropriate for aircraft.
- Taxi with full nose up elevator.
- Align aircraft on takeoff path without stopping.
- Determine wind direction and speed; hold aileron into wind.
- Advance throttle smoothly, maintain maximum power.
- Verbally verify “Airspeed alive and Engine Instruments are in the Green. “
- Maintain directional control on center of takeoff path.
- Adjust ailerons as necessary for existing wind conditions.
- Liftoff as soon as practical and remain in ground effect while accelerating.
- Accelerate to and maintain 80 KIAS as appropriate.
- Positive rate of climb, out of useful runway, GEAR UP
- Maintain 80 KIAS and takeoff power until traffic pattern altitude or safe maneuvering altitude.
- Maintain ground track over extended centerline of runway until a turn is required.
- At 500ft AGL, complete “Climb Flow”. Complete Climb Checklist at or above 1000 AGL
- At 500 feet AGL, Set power to 25 in MP, Set Prop to 2500 RPM
- At 300ft below Traffic Pattern altitude, initiate a turnout to the desired direction
- Complete Pre--Maneuver Checklist
- Select entry altitude that will allow recovery to be completed no lower than 4500 feet AGL.
- Select a visual outside reference and a simulated ground altitude no more than 500 feet below entry altitude.
- Reduce power to 17 Inches MP.
- Below 140 Knots Gear Down. “Verify Green Lights”
- Below 120 knots-- 10° FLAPS
- Below 110 Knots-- FULL FLAPS
- Below 100 knots-- PROPS FULL forward
- Maintain assigned altitude and heading as aircraft slows to 85 knots or approach speed.
- Establish a stabilized glide at 85 KIAS until 100 feet above simulated ground altitude.
- Reduce power to IDLE and increase pitch for a stall.
- Recognize and announce stall warning horn.
- Bring to imminent stall (COMMERCIAL)
- Promptly recover by simultaneously adding full power, decreasing angle of attack, level wings, FLAPS set to 20°
- Establish a positive rate of climb and climb at 80 KIAS, Set Flaps 20°.
- Positive rate of climb, Gear up.
- Climb at 85 KIAS and set Power to 25 Inches MP, and prop to 2500 rpm.
- Resume normal cruise, Cruise checklist.
- Complete Pre--Maneuver checklist
- Select a visual outside reference. Match it with Heading Indicator.
- Select entry altitude that will allow recovery to be completed no lower than 4500 AGL.
- Reduce power to 17 inches MP.
- Below 140 Knots-- Gear Down. “Verify Green Lights”
- Below 100 Knots-- Prop Full Forward
- Maintain assigned altitude and heading as aircraft slows to 71 KIAS
- At 71 KIAS, apply 20 inches MP, and pitch for a stall.
- Bring to imminent stall (COMMERCIAL)
- Promptly recover by simultaneously adding full power, decreasing angle of attack, level wings
- Avoid secondary stalls, excessive airspeed, or altitude loss, spins, and flight below 4000AGL.
- Pitch for Vx, and establish a Positive rate of climb, Gear up.
- Climb at 85 KIAS and set Power to 25 Inches MP, and prop to 2500 rpm.
- Accelerate to VY and continue positive rate of climb.
- Resume normal cruise, Cruise checklist.
- Complete Pre--Maneuver checklist
- Select a visual outside reference. Match it with Heading Indicator.
- Select entry altitude that will allow recovery to be completed no lower than 4500 AGL.
- Reduce power to 17 inches MP.
- Below 100 Knots-- Prop Full Forward
- Maintain assigned altitude and heading as aircraft slows to 85 KIAS
- At 85 knots, apply 20 inches MP, and pitch for a stall.
- Bring to imminent stall (COMMERCIAL)
- Promptly recover by simultaneously adding full power, decreasing angle of attack, level wings.
- Avoid secondary stalls, excessive airspeed, or altitude loss, spins, and flight below 4000 AGL.
- Climb at 85 KIASand set Power to 25 Inches MP, and prop to 2500 rpm.
- Accelerate to VY and continue positive rate of climb. 13. Resume normal cruise, Cruise checklist.
- Complete Pre--Maneuver checklist
- Pick a visual reference
- Select altitude no lower than 4500 feet AGL.
- Reduce power to 17 inches MP.
- Below 100 knots, Prop FULL forward
- Maintain assigned altitude and heading.
- 5 knots above Vs1 (70 KIAS), Bring power to 19 inches MP, or as needed to maintain altitude.
- Slow to and maintain 70 KIAS (+5/--0 COMMERCIAL)
- Maintain the specified altitude ±50 feet, the specified heading ±5°
- Maintain specified angle of bank (±10° if in turning flight).
- Promptly recover by simultaneously adding full power, decreasing angle of attack, level wings.
- Resume normal cruise, Cruise checklist
- Complete Pre--Maneuver checklist
- Pick a visual reference
- Select altitude no lower than 4500 feet AGL.
- Reduce power to 17 inches MP.
- Below 140 knots, GEAR down
- Below 120 knots, FLAPS 10
- Below 110 knots, FLAPS Full
- Below 100 knots, PROPS FULL
- Maintain assigned altitude and heading.
- 5 knots above Vso (60 KIAS), bring power to 19 inches MP, or as needed to maintain altitude.
- Slow to and maintain 60 KIAS (+5/--0 COMMERCIAL)
- Maintain the specified altitude ±50 feet, the specified heading ±5°
- Maintain specified angle of bank (±10° if in turning flight).
- Promptly recover by simultaneously adding full power, decreasing angle of attack, level wings.
- Resume normal cruise, Cruise checklist
- Complete Pre--Maneuver Checklist
- Select and maintain altitude that will allow maneuver to be performed no lower than 4000 feet AGL.
- Maintain 19 inches MP and 2300 RPM
- Enter at 110 knots
- Select Entry heading and visual reference point
- Beginning to the left, Roll into a coordinated 360° turn while maintaining a (Commercial) 55°bank angle ±5° and roll out on the entry heading ±10°.
- Pitch to Keep the Horizon on a constant point while maintaining bank angle.
- Set power to approximately 20 inches MP
- Maintain the entry altitude ±100 feet and airspeed ± 10 KIAS.
- Upon roll out, Clear the right side of the aircraft for any traffic, and begin maneuver in to the right using the same procedures prescribed above.
- After completion of the maneuver maintain heading ±10°.
- Complete Pre--Maneuver Checklist
- Close Cowl Flap on the simulated inoperative engine (LEFT)
- Select and maintain altitude that will allow maneuver to be performed no lower than 4500 feet AGL.
- Select Entry heading and visual reference point
- Maintain 20 inches MP and 2300 RPM
- Below 100 knots, PROPS FULL
- LEFT engine-- POWER to IDLE
- RIGHT Engine-- Mixture, Propeller, Throttle FULL forward
- Maintain directional Control (5° BANK and Half Ball slip)
- Establish a 1 knot decrease in airspeed per second
- Recover at Which EVER comes FIRST: -- Stall warning horn -- Buffeting -- Loss of Directional Control
- IMMEDIATELY and SIMULTANEOUSLY REDUCE POWER AND REDUCE AOA.
- Establish a climb at 85 knots (Blue Line) and apply full power to the operative engine (RIGHT)
- Complete Pre--Maneuver Checklist
- Close Cowl Flap on the simulated inoperative engine (LEFT)
- Select and maintain altitude that will allow maneuver to be performed no lower than 4500 feet AGL.
- Select Entry heading and visual reference point
- Maintain 20 inches MP and 2300 RPM
- LEFT engine-- Perform ZERO THRUST (8”MP/ 2000 RPM)
- RIGHT Engine-- Mixture, Propeller, Throttle FULL forward
- Maintain directional Control (5° BANK and Half Ball slip)
- Establish 85 KIAS (BLUE LINE)
- Commence Drag demonstration: -- Extend Gear-- NOTE VSI rate -- Extend Flaps-- NOTE VSI rate -- IDLE left Engine-- NOTE VSI rate
- Maintain 85 knots, Flaps up, Gear up
- Return to normal cruising state.
- Complete Pre--Maneuver Checklist
- Select and maintain altitude no lower than 4500 feet AGL.
- Power to 17” MP
- Below 140 KIAS-- Gear Down. Verify 3 green , No RED
- Below 100 KIAS-- PROP full forward
- Cowl Flaps Close
- Power-- IDLE
- Establish descent no more than 140 KIAS.
- Recovery should be initiated to where the aircraft is recovered no less than 2000 feet AGL
- Power to 15” MP.
- BELOW 112 KIAS, GEAR UP
- Resume normal cruise Note. Aircraft engine will cool down during the descent. Exercise caution as to not overstress the engine during application of power during the recovery. Wait until the CHT’s are in the Green arc until applying significant power.
- Enter and fly traffic pattern according to standard procedures.
- Complete before landing checklist at or prior to Mid--field.
- At Mid--Field-- GEAR down
- Reduce power to 15 inches MP, lower the flaps to 10o and maintain altitude while decelerating to 105 KIAS abeam intended point of touchdown.
- Turn base when intended point of touchdown is approximately 45o behind wing.
- Extend flaps 20o and pitch for 95 KIAS
- Maintain 95 KIAS during the base
- Turn final and maintain proper ground track.
- Extend flaps to 30°
- Below 100 knots, PROP full forward
- Reduce airspeed to 85 KIAS.
- Adjust pitch and power as necessary to maintain airspeed and descent angle.
- On short final pitch for 75 KIAS
- Smoothly reduce power to idle over threshold.
- Transition from approach to landing altitude approximately 10 to 15 feet above runway by applying back elevator pressure and crosswind correction as necessary.
- Touchdown smoothly at approximate stalling speed, beyond and within 400 feet of intended touchdown point, with no appreciable drift, and airplane’s longitudinal axis aligned with and over runway centerline.
* *GEAR configuration checks will be made during the Downwind, base and Final legs**

- Enter and fly traffic pattern according to standard procedures.
- Complete before landing checklist at or prior to Mid--field.
- At Mid--Field-- GEAR down
- Reduce power to 15 inches MP, lower the flaps to 10oandmaintain altitude while decelerating to 105 KIAS abeam intended point of touchdown.
- Turn base when intended point of touchdown is approximately 45° behind wing.
- Extend flaps 20o and pitch for 95 KIAS
- Maintain 95 KIAS during the base
- Turn final and maintain proper ground track.
- Extend flaps to 30°
- Below 100 knots, PROP full forward
- Reduce airspeed to 85 KIAS.
- Adjust pitch and power as necessary to maintain airspeed and descent angle.
- On short final pitch for 75 KIAS
- Smoothly reduce power to idle over threshold.
- Transition from approach to landing altitude approximately 10 to 15 feet above runway by applying back elevator pressure and crosswind correction as necessary.
- Touchdown smoothly at approximate stalling speed, beyond and within 100 feet of intended touchdown point, with no appreciable drift, and airplane’s longitudinal axis aligned with and over runway centerline.
* *GEAR configuration checks will be made during the Downwind, base and Final legs**
**Flaps are set to the discretion of the PIC in order to place the aircraft on the intended touchdown point**
- Apply full RPM and FULL manifold pressure, pitch to 71 KIAS
- Establish a positive rate of climb
- GEAR UP
- FLAPS UP
- Cowl flaps open
WARNING
Level flight may not be possible with certain combinations of weight, temperature and altitude. In any event, DO NOT attempt a one--engine in--operative go--around after flaps have been fully extended.
The objective of this maneuver is to pilot the aircraft to an alternate airport in case the point of intended landing is no longer available. This can include reasons due to unpredicted weather, a system malfunction, or poor preflight planning.
- Once the decision to divert to an alternate airport is made, consideration should be given to returning to your last checkpoint or a prominent landmark and circling until your navigation planning is complete.
- Estimate an approximate heading, distance, and time enroute (ETE) to the alternate airport and note the time that the diversion began.*
- Turn to the estimated magnetic heading and attempt to identify any prominent landmarks nearby. 4. If time permits, and once established on course towards the alternate airport, an accurate course, groundspeed, ETE, and fuel consumption can be determined using the E6B Flight Computer.
- Call the appropriate Flight Service Station (FSS) and approach control if applicable, to amend your flight plan and provide a pilot report (UA/UUA).
- Use the Airport Facilities Directory (AF/D) to determine any airport restrictions at the alternate airport.
- Identify airspace along the diversion route.
*Note: Because of limited cockpit space, and because attention must be divided between flying the airplane, making calculations, and scanning for other air traffic, take advantage of all possible shortcuts and rule of thumb calculations. For example: Use a straight edge and a VOR compass rose for magnetic heading. For groundspeed, 90 KIAS equals 1.5 nautical miles per minute. Thus, it would take approximately 7 minutes to travel 10 nautical miles, plus or minus winds aloft. For fuel consumption, the Cadet would use approximately .2 gallons/min. at 75% power. During a diversion, priority must be given to flying the airplane while dividing attention between navigation and planning.
The objective of this maneuver is to identify different methods of determining aircraft location in the event of becoming lost during flight. This can occur during a cross country into unfamiliar terrain, by poor preflight planning, or restricted visibility due to weather.
- Climb, being mindful of traffic and weather conditions, to identify prominent landmarks.
- Scan the area around the aircraft for prominent landmarks to determine the aircraft’s location.
- Using the aircraft’s navigational instruments, plot an azimuth from either two VOR or NDB facilities, to determine approximate location.
- Circle, so as not to aggravate the situation or wander into restricted or controlled airspace.
- Communicate if still unable to determine location, and request assistance from ATC. Comply with all ATC or FSS instructions.
- Remain Calm at all times.
- Conserve fuel by reducing power to 55% and lean the mixture.
- If the situation becomes an emergency, squawk “7700” on the transponder and seek assistance on 121.50.
- Follow the normal traffic pattern operations procedure for arriving at a towered or non--towered airport.
- At Mid--Field, GEAR down
- Abeam the point of intended landing, reduce power to idle. Begin a gradual descent at 105 KIAS
- At a point approximately 45 degrees from the approach end of the runway, begin a medium bank turn onto the base leg and slow to 95
- While on the base leg, visually clear the final approach area.
- Final approach:
- Set an aiming point in order to land within the first 1/3 of the runway.
- Flaps should remain retracted.
- No--flap approach speed 85 KIAS
- Maintain aiming point with pitch and power corrections until approaching round out.
- At the round out, reduce power to idle and continue the flare to touchdown on the main wheels first at approximately stalling speed.
- Maintain directional control using rudder.
- Do not initiate the after--landing checklist until clear of the runway.
**Note: The descent angle in a no--flap condition is much shallower than when using flaps. Also, landing distances will be increased due to the higher approach speed used.**
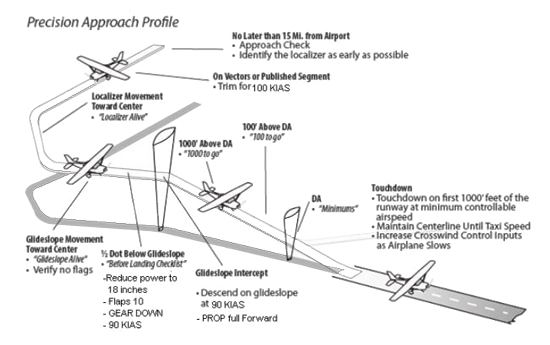
Precision Approach (ILS Approach)
- 10--20 miles from the IAF, Complete the “Approach Checklist” and identify the localizer as early as possible.
- 3 minutes from the IAF, Slow to 120 KIAS.
- 3 miles from the FAF, Slow to 100 KIAS.
- Trim for 100 KIAS when established on a published segment of the approach.
- Announce “Localizer Alive” when localizer begins moving toward center.
- Announce “Glideslope Alive” when glideslope begins moving toward center.
- Verify no flags at glideslope intercept altitude and marker.
- 1 dot below glideslope intercept:
- Below 140 KIAS--Gear Down
- Below 120 KIAS-- Flaps 10
- Below 100 KIAS-- Prop full forward
- Intercept and track the Glide slope. Landing Checklist
- Descend on glideslope at 100 KIAS. * It will take approx. 15” MP and 500 FPM to stay on glideslope.
- Standard Callouts “1000--500--300--200--100 above DA” and “Minimums”
- Upon Arrival at the Decision Altitude, the Pilot Flying Must decide to either land with one of the visual references mentioned in 91.175 or execute the Missed approach.
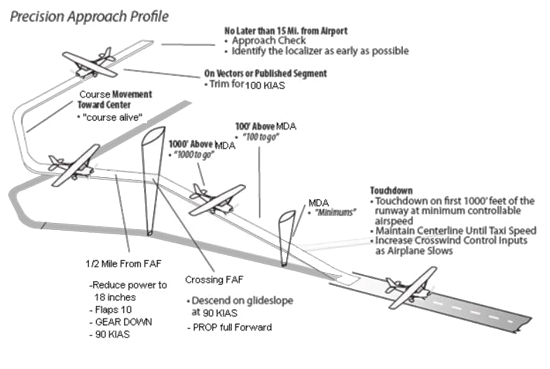
NON--Precision Approach (VOR/NBD/GPS…)
- 10--20 miles from the IAF, Complete the “Approach Checklist” and identify the facility as early as possible.
- 3 minutes from the IAF, Slow to 120 KIAS.
- 3 miles from the FAF, Slow to 100 KIAS.
- Trim for 100 KIAS on vectors until established on a published segment of the approach.
- Announce “Course Alive” when course begins moving toward center.
- ½ mile from the Final Approach Fix:
- Below 140 KIAS--Gear Down
- Below 120 KIAS-- Flaps 10
- Below 100 KIAS-- Prop full forward
- Passing final approach fix descend at 700 FPM and 90 knots using approx. 16” MP
- Standard Callouts “1000--500--300--200--100 above MDA” and “Minimums”
- Maintain the MDA +50 feet, --0 feet.
- Upon Arrival at the Missed approach point, the Pilot Flying Must decide to either land with one of the visual references mentioned in 91.175 or execute the Missed approach.
Single engine Approaches